react-packages
@react-packages/sortable-list
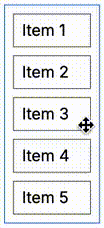
React component that can rearrange an item position in the list by dragging it to the expected position (can change the order of items). Two animated images below depict how this component works.

Usage
To use this component is very simple. You only need to wrap the item elements that you want to sort
with SortableList element as the following example:
import React from 'react';
import SortableList from '@react-packages/sortable-list';

export default function SortableListDemo() {
    return <div className='flex flex-col border border-blue-500 w-24 p-2 gap-2'>
    <SortableList>
        <span className='items-stretch border border-gray-500 px-2 py-1'>
            Item 1
        </span>,
        <span className='items-stretch border border-gray-500 px-2 py-1'>
            Item 2
        </span>,
        <span className='items-stretch border border-gray-500 px-2 py-1'>
            Item 3
        </span>,
        <span className='items-stretch border border-gray-500 px-2 py-1'>
            Item 4
        </span>,
        <span className='items-stretch border border-gray-500 px-2 py-1'>
            Item 5
        </span>
    </SortableList>
    </div>
}
SortableList component doesn’t insert a container element to wrap the item elements. Therefore,
from above example, all span elements are direct children of div element. Because of this, you
can set CSS of those elements as if no SortableList element.
Actually,
SorttableListcomponent inserts two hidden item elements which take no space. They are needed to get the reference of all item elements and set the needed event handlers.
Using state variable to make the order of items persistent
If we use the example above, the order of items will be reverted to the beginning order when the
component containing SortableList is re-rendered. To make the order persistent, we must use a
state variable as the following example:
import React from 'react';
import SortableList, {type SortableChildren} from '@react-packages/sortable-list';

export default function SortableListDemo() {
    const [itemELms, setItemElms] = React.useState<SortableChildren>([
        <span className='items-stretch border border-gray-500 px-2 py-1'>
            Item 1
        </span>,
        <span className='items-stretch border border-gray-500 px-2 py-1'>
            Item 2
        </span>,
        <span className='items-stretch border border-gray-500 px-2 py-1'>
            Item 3
        </span>,
        <span className='items-stretch border border-gray-500 px-2 py-1'>
            Item 4
        </span>,
        <span className='items-stretch border border-gray-500 px-2 py-1'>
            Item 5
        </span>
    ]);

    return <div className='flex flex-col border border-blue-500 w-24 p-2 gap-2'>
        <SortableList onOrderChange={elms => setItemElms(elms)}>
            {itemELms}
        </SortableList>
    </div>;
}
How to save the new order of items into database
Usually, the purpose of using this component is we want to re-order the items in the list and save
the new order into database. Now, how to read the new order of items? In DOM API, there is
querySelectorAll
function that can read the latest HTML structure that has dynamically changed. Need to remember,
SortableList changes HTML structure.
The state variable in the example above, contains
React.ReactElementobject. It’s hard to read.
To read the order of items, each item element must contain a unique ID. querySelectorAll function
will read these IDs in the order as the same as the order of item elements at that moment. Every
time we change the order of item elements by dragging them, querySelectorAll will read the
elements in the up-to-date order.
For example, we change the example above by putting a hidden input inside each item element which holds the item ID. “Save Order” button reads the current order and save it to database.
import React from 'react';
import SortableList, {type SortableChildren} from '@react-packages/sortable-list';
import {saveOrder} from './db/menu-order';

export default function SortableListDemo() {
    const [itemELms, setItemElms] = React.useState<SortableChildren>([
        <span className='items-stretch border border-gray-500 px-2 py-1'>
            <input type='hidden' name="id" value="1" />
            Item 1
        </span>,
        <span className='items-stretch border border-gray-500 px-2 py-1'>
            <input type='hidden' name="id" value="2" />
            Item 2
        </span>,
        <span className='items-stretch border border-gray-500 px-2 py-1'>
            <input type='hidden' name="id" value="3" />
            Item 3
        </span>,
        <span className='items-stretch border border-gray-500 px-2 py-1'>
            <input type='hidden' name="id" value="4" />
            Item 4
        </span>,
        <span className='items-stretch border border-gray-500 px-2 py-1'>
            <input type='hidden' name="id" value="5" />
            Item 5
        </span>
    ]);

    return <div>
        <div id="list2" className='flex flex-col border border-blue-500 w-24 p-2 gap-2'>
            <SortableList onOrderChange={elms => setItemElms(elms)}>
                {itemELms}
            </SortableList>
        </div>
        <div className="mt-1">
            <button
                className='cursor-pointer font-bold'
                type='button'
                onClick={() => {
                    const list = document.getElementById('list2') as HTMLDivElement;
                    const ids: string[] = [];
                    const inputs = list.querySelectorAll('input[name=id]');
                    for (let inp of inputs) {
                        ids.push((inp as HTMLInputElement).value);
                    }
                    saveOrder(ids).then(resp => {
                        //Place the code for success process
                    }).catch(() => {
                        //Place the code for failed process
                    });
                }}
            >Save Order</button>
        </div>
    </div>;
}
Mouse cursor
SortableList changes the mouse cursor style of item element to be “move” cursor. If you want
another cursor, define a CSS class which declares cursor property with !important rule and then
apply this CSS class to the item element. For example, if you want the default cursor and you use
Tailwind CSS then you must use
<span className='flex-1 border border-gray-500 px-2 py-1 !cursor-default'>
    <input type='hidden' name="id" value="3" />
    Item 3
</span>
SortableList component prop
onOrderChange
is a function whode type of(items: SortableChildren) => any. This function is invoked every time the order of item elements changes. The example of the use of this function, you can see in the second example above. This prop is optional.